Sunday, July 12, 2009

Banana Cupcakes

So today I decided that it would be fun to try to make some cupcakes from scratch and since I just recently picked up Martha Stewart's Cupcakes I figured I would try one in there.
First thing I made was the Roasted Banana Cupcakes
Meet the cast:
3 Ripe bananas, plus 1 to 2 more for garnish
2 cups cake flour (not self-rising), sifted
1/2 tsp baking soda
1/2 tsp baking powder
3/4 tsp salt
1/2 cup (1 stick) unsalted butter, at room temperature
3/4 cup sugar
3 large eggs, separated
1/2 cup sour cream
1 tsp pure vanilla extract
Honey cinnamon frosting (recipe follows)
Pre-heat oven to 400. Line std muffin tins with paper liners. Place 3 whole bananas unpeeled on baking sheet and bake for 15 minutes. (peels will darken) Meanwhile, sift flour, baking soda, baking powder, and salt. Remove bananas from oven and let cool before peeling, Reduce oven to 350.
After roasting the bananas in a 400 degree oven for 15 minutes you get something like this:
With and electric mixer on med-high speed, cream butter and sugar until pale and fluffy. Add egg yolks one at a time beating until each is Incorporated, scraping down sides of bowl as needed. Add roasted bananas, and beat to combine. Add flour mixture in 3 batches, alternating with two additions of sour cream, and beating until just combined after each. Beat in vanilla.
In another mixing bowl, with electric mixer on medium speed, whisk egg whites to soft peaks; fold 1/3 into batter to lighten. Gently fold in remaining whites in two batches. Divide batter evenly among lined cups, filling each 3/4 full. Bake, rotating halfway through, until a cake tester inserted in centers comes out clean, about 20 minutes. Transfer tins to wire racks to cool.
The recipe is for 16 cupcakes - I ended up getting 18

I followed the recipe for the first 9 and make the honey cinnamon icing for them.
Honey-cinnamon frosting (makes enough for 16 cupcakes) {I halved the recipe and had just enough for the 9 cupcakes}
2 12 cups confectioners' sugar, sifted
1 cup (2 sticks) unsalted butter, room temperature
2 tbsp honey
1/4 tsp ground cinnamon
With an electric mixer on medium speed, beat all ingredients until smooth.
This is how they turned out:

They were pretty good but I think that I would use more banana next time, even roasted it seemed a bit tame on the flavor. I also thought that the icing was a tad too sugary but Steve liked them!
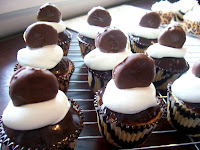
For the remaining 9 cupcakes I decided to give it my own twist. I used to love getting those chocolate frozen bananas at the amusement park back in the day so thought that I would do something like that. First I made a simple ganache glaze
I halved the original recipe - this is what I used:
3 ounces semisweet chocolate, finely chopped
1/3 cup heavy cream
2 tbsp light corn syrup

Place chocolate in a medium heatproof bowl. Bring cream and corn syrup just to a simmer in a small saucepan over medium-high heat. Pour mixture over chocolate. Let stand, without stirring, until chocolate begins to melt.
Using a flexible spatula, gently stir chocolate and cream until totally combined, begin near the center of the bowl and gradually work your way toward the edge, pulling in as much chocolate as possible. Mix until smooth and glossy.
After I finished the ganache simply dip the top of the cupcake in letting the excess drip off. Set on wire rack to cool.
To finish off I topped the cupcake with a spoonful of freshly made whipped cream then added a slice of chocolate covered banana!

My take on these
eh.... I like the idea but it isn't quite there yet. The chocolate covered banana slice is great but I think I might go for a chocolate ganache frosting instead of the glaze. Maybe give it a chocolate filling too.... I like the whipped cream on it but of course you shouldn't add it until right before you plan to serve...... I think next time we will nix the whipped cream go for the filling and frosting and see how that is.
I also think that I will use all purpose flour for the cupcakes rather than the cake flour - I did not really like how dense it made them. Definitely more more more banana!!!

Sausage Egg-n-cheese mcmuffin

Steve's Aunt recently saw (and tasted) my hamburger cupcakes and asked if I would be able to make her a cupcake that looked like a breakfast item for a celebration she is having at work in August. She had mentioned a sausage egg-n-cheese mcmuffin as an idea. Well Steve and I tossed some ideas around and I figured I would give it a go while I was making more hamburgers for a friend. I ended up using just the bottoms of the cupcake for the "mcmuffin", basically the inside of a cakepop (just minus the chocolate outside) for the sausage patty and whipped vanilla frosting for the egg. I tinted some extra frosting yellow and just put a small drop on the white frosting for the "yolk". The cheese is fondant that was tinted with yellow and red icing color.
I think they turned out pretty well don't you.....


We sent the picture to Aunt Sandy as well and she was thrilled!!! Asked for 2 dozen of them!
Seems August will be the kick off of Tay's Tasty Treats with that order, a 7 dozen order for a work picnic and a friend of mine is trying to get my very first birthday party!!!!

I did decide to change the logo though - what do you think....

4th of July Cupcakes

This year my parents / sister threw a huge 4th of July / 30th Birthday & going away party for my Brother-in-law who will be heading back to Iraq in the next few months. I decided that I would bring cupcakes - shocker I know!! So to in honor of the 4th I made some red velvet cupcakes with cream cheese icing and topped off with red, white, and blue stars - oh so festive


I also decided that for fun I would do batch of hamburger cupcakes that I am sure you have seen once or twice on one blog or another. These were a HUGE hit!


Check Spelling
Enjoy!

Wednesday, June 3, 2009

Psssssst...I know a secret

The Brown Eyed Baker is having a give away!!!! Check out her blog an leave a comment of what your favorite cookie is and be entered into a drawing to win Field Guide to Cookies
Click here to enter

Tuesday, June 2, 2009

Should I??


Since doing the baby shower cupcakes my husband thinks that I should start a designer cupcake and cookie side job. Just something small – flyers and word of mouth to get orders and what not.
What do you think?
Crazy?
If I do, what do you think of this logo?

Sunday, May 31, 2009

Babyshower Cupcakes

So I came across this blog post in my google reader the other day from Annie's Eats (which is a fantastic blog by the way) and fell in love with the butterfly cupcakes. A friend of mine recently bought Hello, Cupcake! so I was really wanting a reason to make these cupcakes, but really had nothing that called for anything so elaborate. That is until Pamela; a friend from work; emailed me and asked if I had any ideas for cupcakes for her daughter's baby shower. Umm, I sure do!! This was just the excuse that I needed to make these gorgeous cupcakes! The mommy to be's colors were green, pink, and yellow so that is what I went with. I made 2 dozen butterfly cupcakes and another 2 dozen with some adorable sprinkles that I found at my new favorite store, Grandma's Cupboard
The wing took a bit of time to do and I think next time I would use a condiment bottle to try and pipe the chocolate but I think that they turned out pretty darn good!!!! I didn't get to actually go to the baby shower as I already had plans but I hope that Mommy-to-be was as happy with them as I was!!!
Here is a look at how they turned out!


Monday, May 4, 2009

Pumpkin Roll


So it has been FOREVER since I posted - What can I say....

So I am going to attempt to start catching up a bit. At least start blogging what I do make so here goes. I made this pumpkin roll for my Creative Memories Open House day in November. It was a mess to make but it turned out great! I am not a pumpkin pie fan at all but I LOVE pumkin roll!!!

Tuesday, September 16, 2008

Buffalo Chicken Lasgna

Sounds different I know and the thought of putting tomato sauce with buffalo sauce didn't seem right to me either - but it is! Has a nice little kick but not too much so even your big baby of a husband (when it comes to spicy things) can eat it without crying! Can't say that for the Fiesta dip that I made to watch the football game! Even my Mom didn't' complain about it and he did - geez!

Sorry, no pictures of this one – we had a bit of a windstorm that knocked a branch onto a power line and then caught on fire. Was very interesting to see but also made no good lighting available for picture taking!
Thankfully the lasagna was pretty much done and I had just put the cheese on and popped it back into the oven when the power went out! Turned out pretty darn good! Not to bad for your waist line either – figuring it out on sparkrecipes.com shows it to be 365 calories per serving with 30 grams of protein!
My changes are noted in blue

12 Whole Wheat Lasagna Noodles, uncooked – I used regular lasagna noodles
1 lb. Skinless Chicken Breast – I used 2 decent sized breasts
3 Cups Hunt’s Four Cheese Spaghetti Sauce
1 Cup Very Mild Buffalo Wing Sauce
1 1/2 Cups Water – I only used about 1 ¼ cup
15 oz. Nonfat Ricotta Cheese
1/2 Cup Egg Substitute
9 Slices 2% Pepperjack Cheese

Preheat the oven to 350 degrees. Spray skillet with nonstick cooking spray. Cook chicken over medium high heat for 4 minutes or until almost done. I wanted more of a shredded chicken so I baked mine, let them cool a bit and then cut up very small – put back into the pan and Stir in sauces and water. In a small bowl, combine ricotta cheese and egg substitute. Spray a 9X13 pan with nonstick cooking spray. Spread 1 Cup of sauce in the bottom of pan. Arrange 4 noodles over the sauce. Spread more sauce, then a layer of ricotta mixture. I found it a lot easier to do the ricotta and then the sauce Add another layer of sauce, and repeat the whole process until you end with a layer of sauce. Cover and bake 70 minutes. Uncover and place cheese slices on top, then bake for another 15 minutes uncovered.
Let stand 10-15 minutes before serving.
Makes 8 large servings

Monday, September 8, 2008

Browns Party!!!!

It is that time of year again - Football Season!!! I love football season! Every Sunday hubby and I park ourselves in front of the TV and cheer on the Browns! It is in my opinion the best time of year - it gives me a reason to cook for a crowd every single Sunday! Well maybe not every Sunday this year since we have a few Monday night games and even a Thursday night game but...
This year not only did we get to throw our annual Browns kick off the Season party in our new house we got to throw it in our just renovated basement rec-room! When I say "just renovated" I mean carpet installed Friday, furniture delivered Saturday, party on Sunday! I LOVE!!! our new basement!

See the chair in the corner - that is my chair, the female version of ones stake to a chair - it is a round swivel chair with a brown leather base, camel microfiber seat with a pillow back - oh so comfortable! I heart it very much!


I love the bar even more though! Oh it is so so so pretty!!! Especially against the red wall - the black marble top stands out and just pops! Oh I love it!!! Hubby and I have dreamed of having a bar in the basement but didn't really think we would ever be able to but I am so so glad that we jumped feet first into debt for it =)
We rationalize it to ourselves that this was our last big thing before popping out the kiddos so we deserve it!


My GORGEOUS niece Haylee enjoying the game with her rocking Aunt Meghan! Love love the cheer leading outfit!
Okay so now onto the food!
This year I cheated A LOT! We were so so busy getting the basement done that I needed easy and I mean E-A-S-Y for the food! So we had:
pulled pork BBQ Sandwiches (recipes will be in separate posts to come)
cheesy potatoes
Tastefully Simple Garlic Garlic dip and Spinach and herb dip with the Wheat Beer Bread
deviled eggs
chips
sugar cookies
sausage and cheese dip with tortilla chips brought by my friend Jami.
The BBQ Pork - very very yummy!

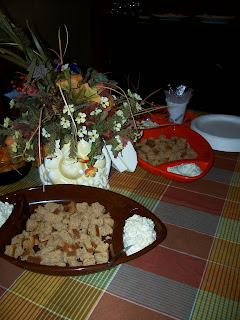
The dips in cute little football serving plates

My adorable football deviled eggs - yumm! Just snip and place the chives on to give the football look.


Tuesday, August 26, 2008

Peach cobbler


At some point on Sunday while hubby and I were working in the basement (or watching Ben work anyway) the peach fairy came to our house. I walked outside and there was a bag sitting on our porch full of gorgeous peaches. I have to assume that this was the work of my wonderful neighbors once again. Can I just tell you that I absolutely heart our neighbors! We have only been in our house since May and they have been nothing but wonderful to us. Giving us zucchini and banana peppers from their garden, helping us out when our drain tile was being replaced, offering to go and get us mulch with the dump truck..... they are honest to goodness the type of neighbors that everyone would love to have.
So what is a girl to do when a bag full of peaches a dropped on your doorstep - make peach cobbler of course.
I have never had peach cobbler so I am not sure if this is what it is supposed to taste like but I will have to guess not. It was a tad bit too runny (which I am pretty sure is my fault) and just not as sweet as I thought it would be. I used Paula Deen's recipe and she has not let me down before so I will take full responsibility for this not being a smashing success.
I did not have a 3 qt dish and I didn't really think that hubby and I needed that much cobbler around so I decided to halve the recipe. Well partly - I left the peach mixture the way it was written and then halved the crust part of it. I believe that my problem came from the flour. I did not have any self rising flour so I added baking powder -which in case you ever wanted to know there is to add 1 1/2 tsp of baking powder and a pinch of salt to 1 cup of flour.
Looking back however I do believe that I did not add enough baking powder and forgot the salt all together. I only added enough baking powder for 1/2 cup of flour rather than the 3/4 cup that I used. Ahhh well - live and learn. The cobbler was still good just not great.

Zucchini Bread


I am in love - with Zucchini - this wonderful fruit (I swear it is a fruit) see so yourself
it is versatile! Lately I have made Zucchini Cakes which I hope to attempt again very soon and this time it be a success. You can make pie (another recipe I plan to attempt soon - my aunt made it last year for a family crop and it was wonderful), bake it with some garlic and EVOO to serve as a side dish, cut up and eat it raw with some salt so so much you can do with it. My wonderful neighbor brought me one over recently out of their garden and went straight for the kitchen to make some Zucchini Bread.
I used a recipe which I found on allrecipes and it turned out wonderful!!!!! You can find it here
I doubled the recipe and instead of adding nuts I added 1 cup of mini chocolate chips. Doubling the recipe gave me 3 regular size loaves and 2 mini loaves. I unfortunately gave all but one mini-loaf away and now I am out =( I think I will be going next door very soon to get another zucchini to make some more and this time I will freeze it for hubby and I.

Zucchini Cakes


I based the recipe for this little batch of failure on this recipe from Paula Dean.
I did not add onion (because I do not care for it) and instead of Italian Seasoning I added some fresh parsley, thyme, and lemon basil. I call this a failure because as you can see from the picture they got a tad bit done. They tasted pretty good (minus that slight burnt taste) but not near as good as they could / should have tasted. The house smelled fantastic but I ended up tossing most of them - hubby didn't even get to try them. I do believe that my problem was that I failed to squeeze the water out of the zucchini so the patties just wouldn't stay together. Them not staying together made them too thin and blah blah blah yeah whatever - they sucked. So learn from me - drain the water - place in a clean kitchen towel and squeeze the crap out of it.